
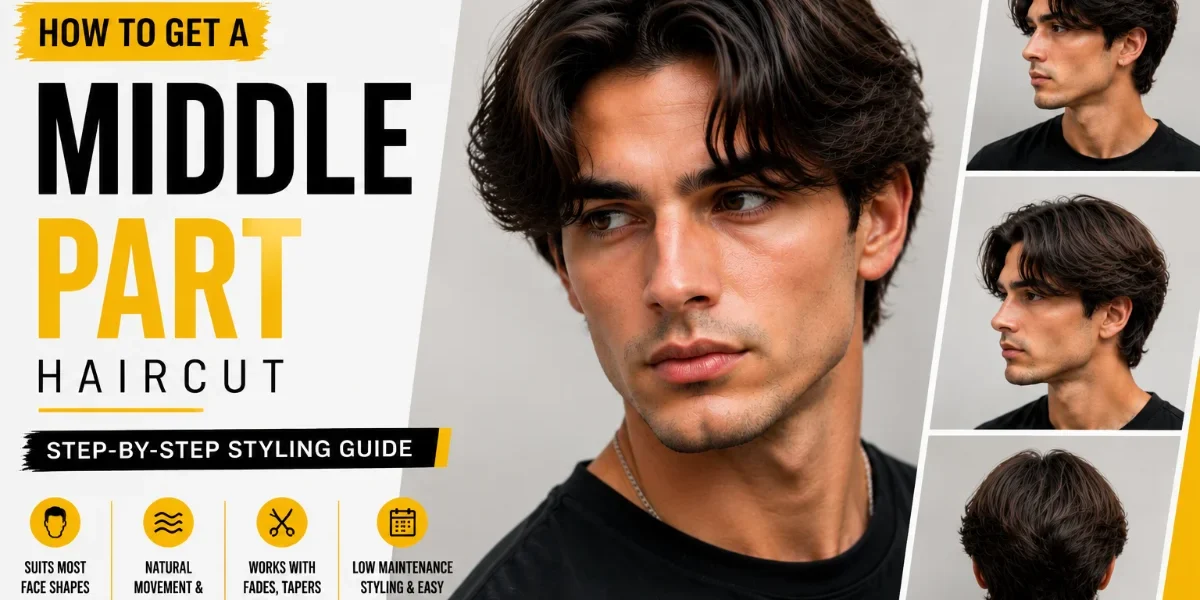

Quick Answer: You need at least 4–5 inches of hair on top — enough for the fringe to reach your eyebrows. Part damp hair down the centre, blow-dry each side outward with a round brush, then finish with a matte clay. Training takes 2–3 weeks.
This guide covers the cut, the styling, and the training — the three things that decide whether your middle part actually holds or flops sideways by lunch. If you’re still choosing between styles, start with our full breakdown of middle part hairstyles for men.
Most guys walk into my chair asking for a middle part without enough length. Everything below assumes you’re ready or want to know when you will be.
How Do You Style a Middle Part Step by Step?
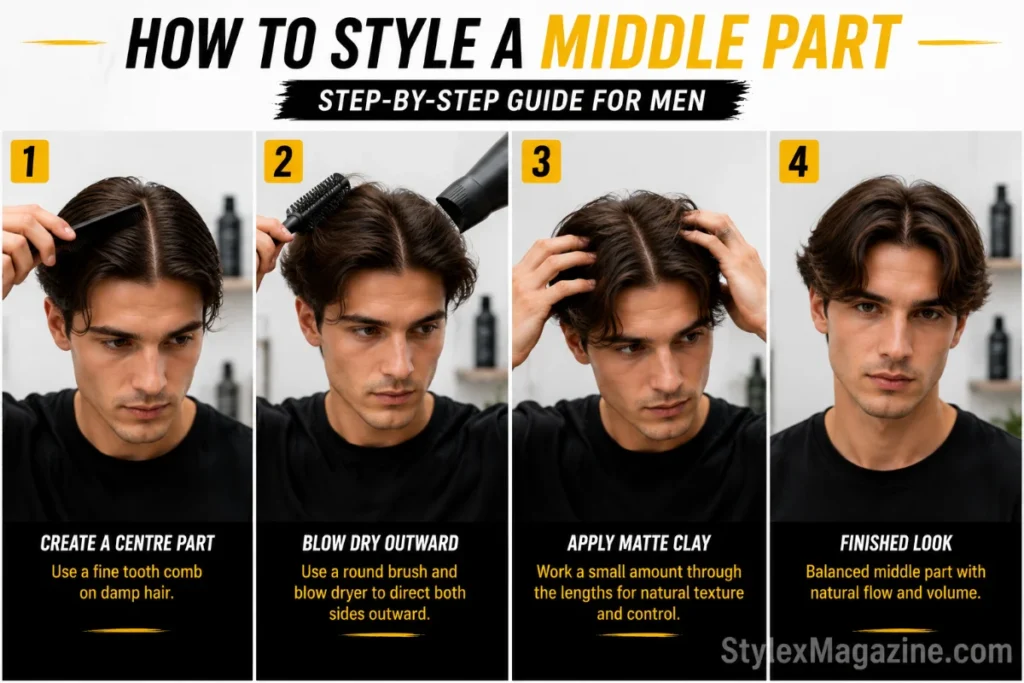
Start with clean, damp hair and work in five steps. Anything else is a variation on this base.
- Towel-dry until damp, not dripping. Wet hair takes direction; soaked hair goes wherever gravity pulls it.
- Find your centre. Comb everything straight back first. Then align a fine-tooth comb with the bridge of your nose and slide it straight back through the hair. The split lands where it should.
- Blow-dry one side at a time. Aim airflow down and outward from the part line. Lift the roots with a round brush for volume. Finish one side completely before starting the other — that’s what keeps both curtains symmetrical.
- Apply product after drying, not before. Warm a small amount of matte clay or styling cream between your palms and work it through the mid-lengths and ends. Skip the roots — that’s where it turns greasy.
- Shape with fingers. Pinch and bend the fringe ends outward for the curtain flick. Combing over product flattens the texture you just built.
Straight Hair
Matte paste after blow-drying gives structure without shine. Sea salt spray on damp hair first if you want more grip. Air-drying works but loses roughly half the volume of a proper blow-dry.
Wavy Hair
Sea salt spray on damp hair, scrunch, then diffuse on low heat or air-dry. Skip the round brush — it drags the wave out. Texture clay only on the ends.
Curly Hair
Curl cream on wet hair, part while the hair is still soaking, diffuse on low heat. Never brush once dry. The part line looks softer than on straight hair. That’s normal for curls, not a bad cut.
How Long Does Your Hair Need to Be for a Middle Part?
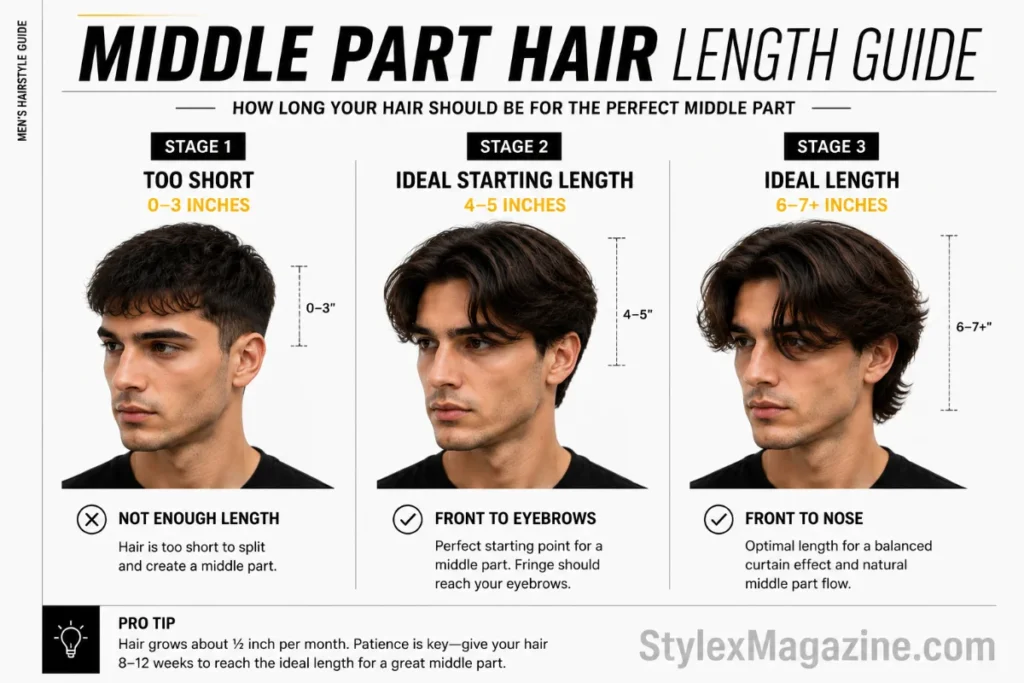
You need at least 4–5 inches on top. The fringe should reach your eyebrows when pulled straight down. Below that length, the hair sticks up at the part line instead of falling to the sides.
Ideally the front pieces reach the tip of your nose when gently pulled — that’s the length that gives the natural s-wave and enough weight to hold shape.
Curly hair shrinks 50% or more once dry, so aim for 6–7 inches of actual length to get 3–4 inches of visible length. Fine hair often needs a touch more length than average to create visible density across the part.
What Tools Do You Need for a Middle Part?
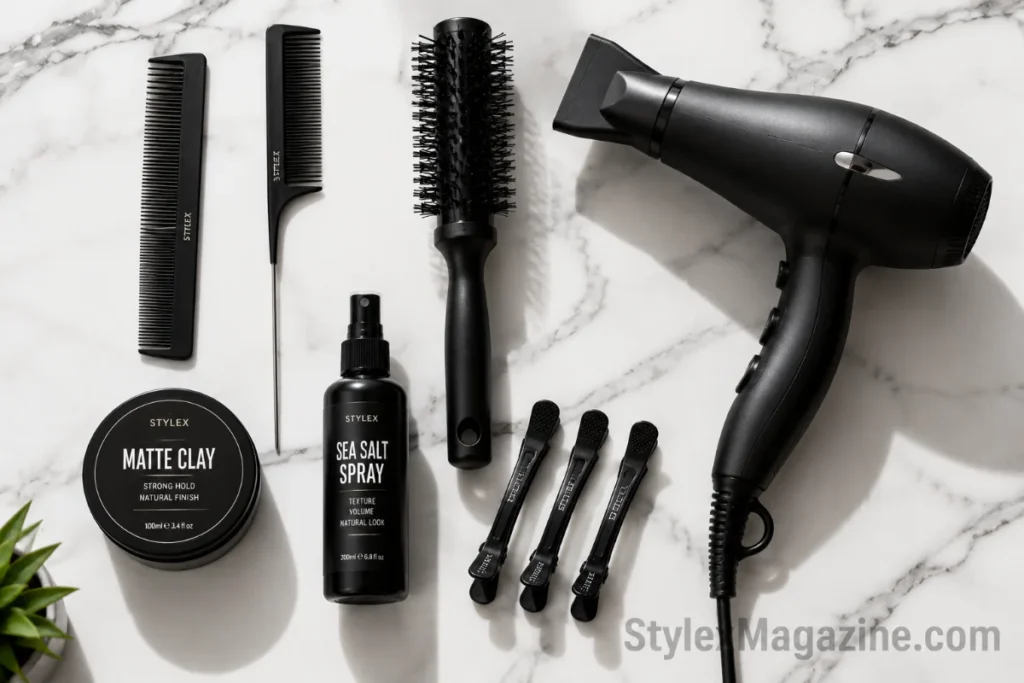
Fine-tooth or rat-tail comb — the only way to get a precise, straight part line. A carbon tail comb is the professional version and gives more control at the scalp.
Blow dryer — sets direction and volume. Without it, the part won’t hold shape past mid-morning.
Round brush — lifts roots away from the scalp. A flat brush does the opposite and is the wrong tool here.
Diffuser attachment — curly and wavy hair only. Preserves the curl pattern while drying.
Non-crease clips — hold each side in the new part direction while drying. Speeds up training significantly.
Heat protectant spray — use it if you’re blow-drying daily.
What Products Work Best for a Middle Part?
Product choice comes down to hair type, not brand.
Sea salt spray adds texture and grip for straight and wavy hair — apply on damp hair before blow-drying. Matte clay gives medium hold with no shine and suits thick or straight hair that needs structure. Styling cream is the flexible all-rounder for daily use.
Curl cream goes on wet hair for curly types only. Texture powder at the roots adds invisible volume for fine or thin hair. Light hairspray is an optional finishing lock. A pre-styler on damp hair gives a smoother base and longer hold.
Product goes after blow-drying, not before. Blow-drying sets direction; product locks it. The only exceptions are sea salt spray and pre-styler, which need damp hair to work. Get this order wrong and the hair weighs down before you’ve even set the shape.
How Long Does It Take to Grow a Middle Part?
Scalp hair grows about 0.5 inches per month, or 4–6 inches per year, according to the Cleveland Clinic. That gives you a real timeline.
From a buzz cut, expect 8–10 months to reach middle-part length. From a 2-inch crop, 4–6 months. The awkward stage hits around month 4–6 — too long for a short cut, too short to part properly. Sea salt spray plus matte clay carries you through it.
During grow-out, tell your barber: “Keep the sides tapered but don’t touch the top length.” That keeps the shape looking intentional without losing progress. Curly hair needs about 50% more time due to shrinkage.
How Do You Train Your Hair for a Middle Part?
Hair has muscle memory. Years of parting one way means the roots resist a new direction — retraining takes daily repetition for a few weeks.
Daily routine. Every time you wash or wet your hair, part it in the new centre position and blow-dry into place. Non-crease clips at the part line while drying speed the process.
Night routine. Dampen the roots before bed, part in the centre, clip in place. Sleep with a low ponytail or a loose braid if length allows. Repeat nightly for one week — the hair falls into position faster than with daytime drying alone.
A scarf wrapped tightly around the part line after drying accelerates the setting further — full method in the troubleshooting section below.
Expect 2–3 weeks of consistent blow-drying to see the hair fall into place on its own. Up to a month if you mostly air-dry. Fine hair trains faster; thick, coarse hair takes longer.
If the dead-centre part never cooperates — usually because of a stubborn cowlick or strong growth pattern — shift the part 1cm to either side. You get the same look with less daily fight.
What Should You Tell Your Barber for a Middle Part Haircut?
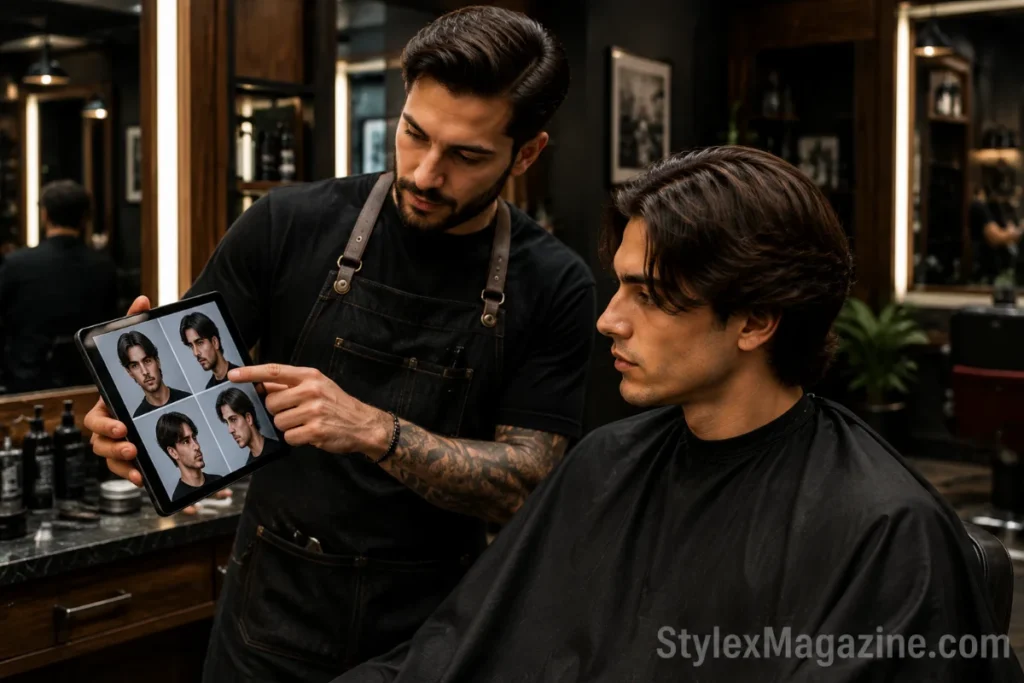
Vague requests get vague cuts. Bring specifics.
Start with length: “I want [X] inches on top, enough for the fringe to fall past my eyebrows when parted in the centre.” Then specify the sides — fade with a clipper number, taper with a scissor blend, or full scissor-cut. Add layering: “Layers through the top for movement” or “one-length fringe, blunt.”
Ask for texturising with point cutting, slide cutting, or thinning shears to remove bulk. Thick, untextured hair sits like a bowl over a centre part. Mention that you’ll be parting down the middle — the cut should fall differently than it would for a side part.
Bring a photo. Front and side view, both.
The #1 mistake I see is “I want curtains” with no length, no side treatment, no layering direction. Results vary wildly. Give the barber those three details and you won’t need to come back for a re-shape.
Not sure which variation to ask for? See our full guide to middle part hairstyles for men.
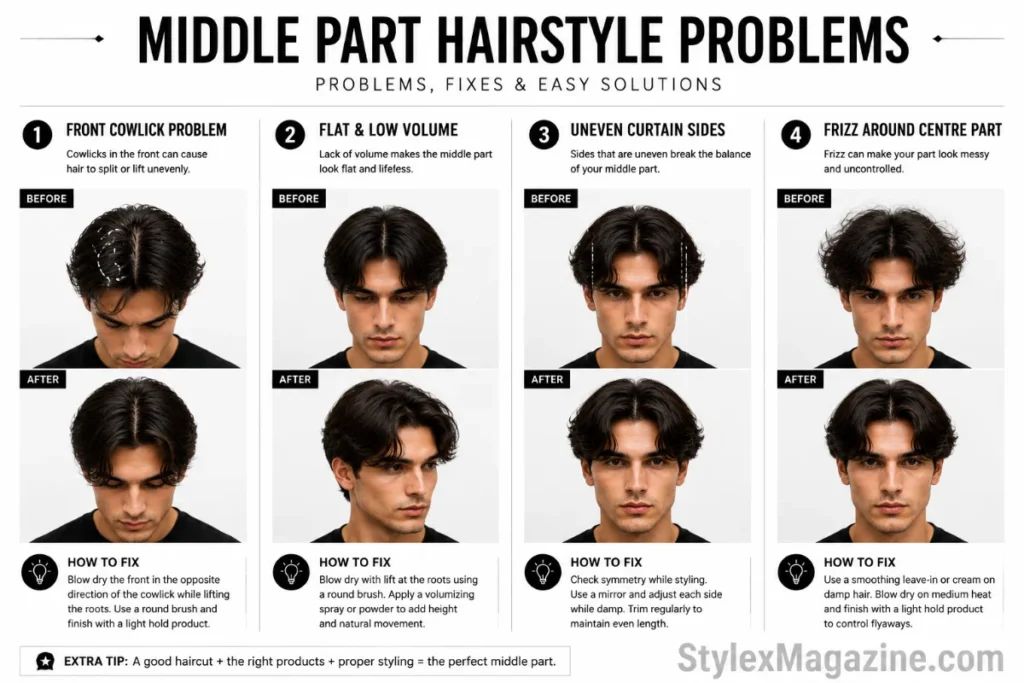
How Do You Fix Common Middle Part Problems?
Cowlick at the Front Hairline
The hair pushes one direction and resists the centre split. Blow-dry against the cowlick’s direction while the hair is very wet — not damp, wet. Once it dries the wrong way, you can’t fix it without re-wetting. A heavy hold spray at the root of the cowlick alone helps. If it still won’t behave, shift to an off-centre part that works with the growth pattern, not against it.
Widow’s Peak
A V-shaped hairline creates an uneven starting point. If the peak sits dead-centre, it actually helps — it acts as a natural division. If it pulls hair to one side, blow-dry from the peak outward in both directions. Longer fringe hides an off-centre peak better than a short one.
Flat, Limp Results
Hair lies flat with no visible lift. The round brush at the roots during blow-drying pulls the hair away from the scalp. Texture powder at the roots after drying adds volume without visible product. Heavy pomades and gels weigh curtains down — swap for a matte clay or cream.
Part Keeps Shifting or Won’t Stay
The part disappears by midday. You’re not blow-drying the part line long enough. Spend extra time at the root of the parting — that’s where hold matters. A light hairspray at the roots only, plus a non-crease clip during drying, forces the part to set.
One Side Sits Higher Than the Other
Asymmetry usually traces back to natural growth direction. Blow-dry the weaker side first, while the hair is at its wettest — wet hair takes direction better. Mirror-check before you touch product.
Frizz at the Part Line
Flyaways along the centre. Wrap a scarf tightly around the part line for two to three minutes after blow-drying — it presses the parting smooth and lays the flyaways flat. A tiny amount of styling cream, smoothed along the part line with fingers, controls the rest without flattening the volume you just built.
What Are the Most Common Middle Part Mistakes?
Blow-drying with the airflow pointed up. Air pushed up against the hair shaft lifts roots the wrong way and roughens the cuticle. Point the nozzle down the length of the hair, from root to tip, on both sides of the part.
Using too much product. Curtains should swing when you turn your head. Stiff means overdone — start with a fingertip-sized amount.
Parting on dry hair. Dry hair resists a new direction. The part sets cleaner when blow-dried into position from damp.
Using a flat brush instead of a round brush. A flat brush pushes hair down against the scalp. A round brush lifts roots up. Wrong brush, flat curtains.
Can You Get a Middle Part Without a Blow Dryer?
Yes, but the shape is softer and drops out faster through the day.
Comb wet hair straight back, create the centre part with a fine-tooth comb, pin both sides with non-crease clips, and let it air-dry fully before loosening and shaping with fingers. Sea salt spray before air-drying adds grip and visible texture.
The heatless method works best on wavy and curly hair. Straight hair tends to fall flat without blow-dry volume.
FAQ’s
Does a middle part damage your hair?
The part itself doesn’t. Daily blow-drying without protection does. Use a heat protectant spray if you’re drying every day and keep the dryer on medium heat, not high.
Can you swim with a middle part?
Chlorine and salt water strip the shape by the end of the day. Rinse hair with clean water before swimming — pre-soaked hair absorbs less pool water. Re-wet, re-part, and blow-dry when you’re out. Wear a swim cap for repeat sessions.
Can you get a middle part with a receding hairline?
It depends where the recession sits. A centre part draws attention to the middle of the forehead, which works if the temples are receding. If the front hairline is thinning at the centre, a textured fringe or side part hides it better.
How often should you wash your hair with a middle part?
Every 2–3 days for most hair types. Daily washing strips the natural oils that give curtains movement. On non-wash days, re-wet the part line with a spray bottle and blow-dry for a quick reset.
Does sleeping ruin a middle part?
It can flatten one side. A satin pillowcase reduces friction and helps the part survive overnight. In the morning, re-wet the roots at the part line and blow-dry for 30 seconds.
Does a middle part make your face look longer?
It can lengthen an already long or oblong face because the vertical part line extends the visual line of the face. Round and square faces suit it better — the centre split adds structural balance.

Other Articles

20 Best Haircuts For Thick Straight Hair (2026 Styles)
18 Best Middle Part Hairstyles for Men (2026)


No Comment! Be the first one.